Table of Contents
Removing broken bolts (or tools) from aluminium
Here are some practical tips on how to remove a broken bolt from a motorcycle's aluminum cylinder. The same instructions can be used if you have a broken ferrous tool inside a block of aluminum.
The problem
 While disassembling the cylinder of an old Honda motorcycle engine (a 1989 NTV 650 Revere), a 6×20 mm bolt fixing a water joint, broke. The bolt was quite rusted, the thread was stuck into the aluminium body of the cylinder and the bolt head came off. About 8 mm of the bolt remained protruding from the aluminium, but grasping it with grip pliers wasn't enough to unscrew it. Using loosening oil, heating the piece with a heat gun, hammer blows, … nothing worked to loosen the bolt.
 I attempted a mechanical fix: I drilled a hole in the bolt with a 2.5 mm bit, then tried to unscrew it with a left-handed broken bolt extractor. The remedy was worse than the damage: the extractor tip broke off inside the bolt: instead of just a normal-steel bolt snapping off in the aluminum, I now had the broken bolt plus about 4 mm of extremely hard HSS steel stucked in it.
Drilling out the extractor tip was impossible; perhaps only a very expensive CBN grinding pin could have filed it. Unfortunately, such pins are very expensive (CBN is a super-hard material, second only to diamond), and I don't know if it would have been possible to chip away the 4 mm of stump thickness.
It seemed the only solution was a chemical method: using a solution capable of dissolving steel without attacking the aluminum. This is what alum can do, a salt commonly used in small sticks to stop microbleeding during shaving!
The solution of potassium alum
 The theory goes that a solution of potassium alum (double sulfate of potassium and aluminium) dissolves ferrous materials but does not attack the aluminum. However, the practice required solving several problems and questions:
- How to immerse the cylinder body into the alum solution without damaging the cylinder barrel which is made of cast iron (a ferrous material)?
- How to heat the solution so that I can use a more saturated solution to speed-up the chemical action?
- How many hours/days will be required to dissolve a bolt, which is 6 mm in diameter and 12 mm long?
Testing the chemical action
To carry out the first tests I proceeded to:
- Purchase 90 g of alum, advertised as a natural product useful for shaving. The price was 2.50 €.
- Purchase a 12 v heating pad, which was rated to work at 60 °C. The price was about 10.00 €.
- Purchare one liter of demineralized water, the kind used for irons or car batteries.
 I made some tests on a similar bolt. Using demineralized water I made two saturated solutions, one at the ambient temperature of 20 °C (100 ml water, 12 g alum) and one at 50 °C (100 ml water, 37 g alum). The solutions were placed in turn into a glass container put above the heating pad, which was turned on only during the 50 °C test. The bolt, once submerged, began to produce small gas bubbles, a sign that the chemical action was working.
| Mass solubility of alum | |
|---|---|
| 20 °C | 12.0% |
| 50 °C | 36.8% |
The bolt was only half submerged in the threaded part. I tried to figure out how much metal is dissolved per day, both in the direction of the diameter and in the length. This is a summary table:
| Temperature | Initial diameter | Days | Final diameter | mm/day |
|---|---|---|---|---|
| 20 °C | 5.85 mm | 4 | 5.58 mm | 0.05 |
| 50 °C | 5.62 mm | 2 | 5.02 mm | 0.30 |
| Temperature | Initial length | Days | Final length | mm/day |
| 20 °C | 25,47 mm | 4 | 25.41 mm | 0.02 |
| 50 °C | 25.34 mm | 2 | 24.88 mm | 0.23 |
As you can see the chemical action on the diameter is more aggressive than the action on the length, because of the threaded surface. Temperature plays a significant role in the reaction rate, by a factor of about ten.
Apply the procedure on the actual piece
Finally I acted on the motorcyle cyilinder. Immersing the entire cylinder in the alum solution was out of the question: it would have required a very large container that would have been difficult to keep at an adequate temperature, and above all, I would have damaged the cast iron barrel!
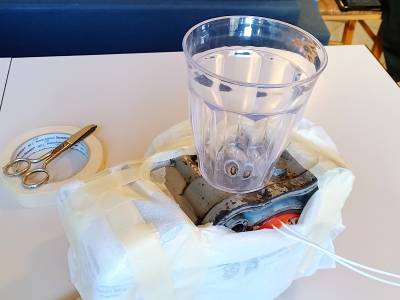
To put the alum solution only on the affected part of the piece, I grab a recipient made of acrylic plastic (which is rigid), I made a hole in the bottom using a small stone grinder and I glued it to the cylinder using silicone sealant.
To heat the metal, I inserted the heating pad inside the cylinder, bending it and filling the space with paper, so that the heating pad would adhere well to the metal. Then I wrapped the whole thing in insulating plastic to prevent the heat from escaping into the air.
This arrangement allowed the alum solution to be kept at around 35°C, where it saturated at 24%, instead of 12% of the room temperature.
The dissolution process began. About every eight hours, I checked to make sure the gas bubbles were still present. I added demineralized water as it evaporated, when alum crystals form by precipitation. The container held about 70 ml of solution, about every three days it became cloudy, so I replaced it with fresh one.
After 4 days the piece of the broken extractor tip was freed and I was able to remove it. The chemical reaction proceed attacking the remaining bolt on both faces and through the hole.
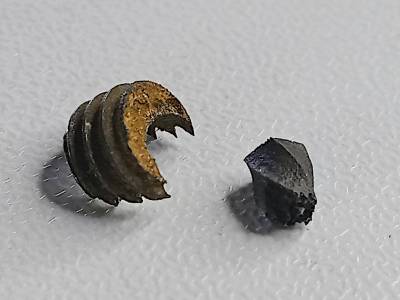
After a total of 11 days I interrupted the operation: a 4 mm piece of the bolt was still in the hole, but I was able to extract it turning it counterclockwise with a needle. In the picture below you can see the resideues of the bolt and the extractor removed:
Temperature and the hole drilled in the bolt played a significant role in the speed of action. Without the hole, only the exposed surface of the bolt would have been attacked, whereas in our case, the chemical action affected the entire length inside the hole too. The dissolution of the bolt thus drilled proceeded along the overall length as per this table:
| Temperature | Initial length | Days | Final length | mm/day |
|---|---|---|---|---|
| 35 °C | 12.00 mm | 11 | 4.00 mm | 0.73 |
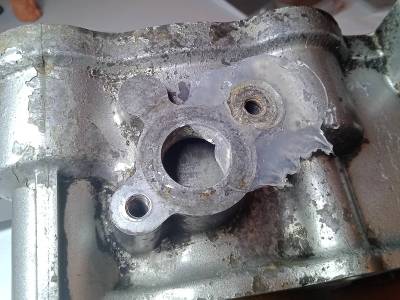
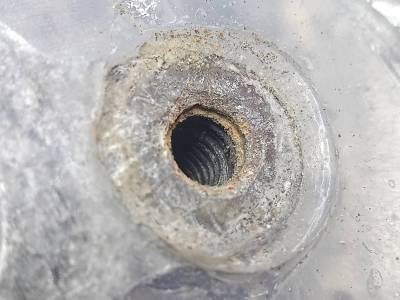
A consideration on the final result: as you can see from the photos, the alum solution did indeed attack the ferrous material and left the aluminum intact. However, the thread of the freed hole were not perfectly intact. When screwing in a new bolt, you could feel a greater amount of play than you could in the other hole. This is likely due to oxidation that had penetrated the thread, causing the bolt to rust and also causing slight deterioration of the aluminum hole.


