Table of Contents
Flowblade HowTo
Problemi riscontrati
Abbiamo provato la versione 2.22 su Debian 13 Trixie. Il programma sembra abbastanza stabile, ma a volte il comportamento della timeline si corrompe: la selezione (con il click sinistro) di alcune clip non funziona, lo spostamento della playhead con i tasti Up e Down smette di funzionare e anche lo zoom con Mouse Middle Click non produce i risultati attesi. Chiudendo e riaprendo il progetto sembra che risolva il problema.
Tale problema è stato riscontrato ad esempio provando il comando Overwrite Range senza aver definito un range sulla timeline; in tal caso l'overwrite avviene all'inizio della sequenza e spesso inizia il comportamento erratico della timeline.
Riferimenti
Basic usage
| Monitor | ||
|---|---|---|
| | Display Timeline / Clip on Monitor | Seleziona cosa visualizzare sul Monitor: la sequenza in lavorazione sulla Timeline oppure la clip scelta dai Media. |
| Clip Delete | ||
| | Splice Out - Delete | Elimina le clip selezionate dalla timeline, le clip successive si spostano a sinistra riducendo la lunghezza totale della sequenza. |
| | Lift - Control + Delete | Elimina la clip selezionata dalla timeline lasciando uno spazio vuoto. La lunghezza totale della sequenza resta inalterata. |
| | Ripple Delete | Elimina le clip selezionate dalla timeline in modo analogo al comando Splice Out, ma in questo caso le clip presenti su altre tracce si spostano a sinistra per mantenere la sincronizzazione. |
| | Range Delete | Elimina dalla sequenza il range selezionato (con i tasti I e O) sulla timeline effettuando i tagli necessari alle clip esistenti. La lunghezza complessiva della sequenza si riduce. |
| Clip Insert | ||
| | Overwrite Range | Sostituisce il range selezionato (con i tasti I e O) sulla timeline con la selezione dal monitor. La selezione deve essere uguale o più lunga del range da sostituire. Effettua i tagli necessari alle clip esistenti che vengono sovrascritte. La lunghezza totale della timeline non cambia. |
| | Overwrite Clip - T | Sostituisce la clip selezionata nella timeline con la selezione dal monitor. La selezione deve essere uguale o più lunga della clip da sostituire. Il pezzo inserito sarà tagliato in modo che la lunghezza totale della timeline non cambi. |
| | Insert Clip - Y | Inserisce la parte selezionata della clip sul monitor nella timeline nel punto di taglio più vicino alla playhead, spostando eventualmente a destra le clip successive. |
| | Append Clip - U | Aggiunge la selezione dal monitor alla timeline, dopo le clip esistenti. |
| Edit Tools | ||
| | Move - 1 | Strumento predefinito: sposta le clip selezionate sulla timeline, una eventuale sovrapposizione taglia le clip sottostanti lasciando inalterata la lunghezza della sequenza. Trascinando all'estremità di una clip esegue il Trim: allunga o accorcia la lunghezza variando di conseguenza la lunghezza complessiva della sequenza. |
| | Multitrim - 2 | Svolge tre funzioni diverse sulle clip della timeline a seconda del punto di click. Sul punto di taglio tra due clip ⇒ Roll: sposta il punto di taglio lasciando inalterata la lunghezza complessiva della sequenza. Al centro di una clip ⇒ Slip: fa scorrere il contenuto della clip a destra o sinistra lasciando inalterata la sua durata. All'estremità di una clip ⇒ Trim: sposta il punto di inizio o di fine modificando la lunghezza complessiva della sequenza. |
| | Spacer - 3 | Trascinando una clip verso destra sulla timeline inserisce uno spazio vuoto alla sua sinistra, tutte le clip successive vengono spostate anch'esse. È possibile trascinare verso sinistra solo se vi è dello spazio vuoto da ridurre. |
| | Insert - 4 | Consente di riordinare le clip sulla timeline: trascinando (a partire dal centro) una clip è possibile spostarla in un altro punto di taglio che viene evidenziato da una freccia gialla. Essendo un riordinamento la lunghezza delle clip e della sequenza complessiva non cambia. |
| | Cut - 5 | Con un click del mouse effettua il taglio di una clip sulla timeline. Il taglio avviene nel punto di click, a differenza del tasto X che effettua il taglio al punto della playhead. |
| | Keyframe - 6 | Facendo click su una clip della timeline viene aperto il keyframe tool per regolare i filtri applicati alla clip. Se non vi è alcun filtro attivo sulla clip viene attivato e mostrato automaticamente quello del volume audio.  . . |
Changing current frame

Zoom and pan the timeline

View the timeline or the clip in the Monitor Panel
In the default view, the top-right part of the windows is the Monitor panel. The monitor is used to view the timeline of the working sequence or the clip choosen from the Media panel. Two buttons are provided to switch from Display Timeline to Clip mode:

Shortcut keys
| Keys in Monitor Panel | |
|---|---|
| Left / Right | Move to previous / next frame. |
| Shift+Left / Shift+Right | Move to previous / next 10 frames. |
| I / O | Add In and Out markers for clip cut |
| Alt+I / Alt+O | Go to In or Out markers |
| Alt+K | Remove In and Out markers |
| U | Insert the clip cutout at the end of the timeline |
| Y | Insert the clip cutout in the timeline before the clip under the playhead |
| T | Replace the clip selected in the timeline with the clip cutout from the Monitor. The cutout must be larger than the clip to be replaced. |
| Keys in Timeline panel | |
| Left / Right | Move to previous / next frame. |
| Shift+Left / Shift+Right | Move to previous / next 10 frames. |
| Up / Down | Move to next or previous cut on topmost active track. |
| Mouse left-click | Select a clip |
| Ctrl+Mouse left-click | Select last clip of a range |
| Mouse center-click | Zoom fit. |
| Mouse wheel | Zoom timeline in / out. |
| Ctrl+Mouse wheel | Pan timeline left / right. |
| X | Cut the clip at playhead. |
| I / O | Add In and Out markers for clip cut |
| Alt+I / Alt+O | Go to In or Out markers |
| Alt+K | Remove In and Out markers |
Keyframe Tool and Keyframe Editor
Per regolare gli effetti di un filtro su una clip si ricorre all'uso di keyframe, cioè determinati fotogrammi della clip per i quali si indica il valore assunto dal filtro. Ad esempio un effetto fade-in dal nero avrà un keyframe sul primo fotogramma dove il valore del filtro è zero (fotogramma tutto nero) e un secondo keyframe sul fotogramma 60 in cui il valore è 100 (fotogramma completamente visibile); in questo modo - se la clip è a 30 FPS - si ottiene un effetto fade-in della durata di due secondi.
Esistono due strumenti per manipolare i keyframe dei filtri: il Keyframe Editor che si attiva nell'Edit Panel e il Keyframe Tool che si attiva sulla Timeline.
Per visualizzare il Keyframe Editor si fa doppio clik su una clip con il tool predefinito Move. L'editor si presenta vuoto se la clip non ha filtri attivi (Clip Has No Filters); con il pulsante + in basso si possono aggiungere filtri video e audio. In questo esempio si sono aggiunti il filtro audio Volume e il filtro video Fade To Black In / Out:

Ogni filtro ha i sui keyframe rappresentati dai piccoli rombi sulla linea azzurra. Con gli appositi pulsanti è possibile aggiungerli, eliminarli, spostarsi su di essi, muoverli a destra e sinistra, ecc. Con lo slider è possibile modificare il valore assunto dal filtro nel keyframe selezionato. Impostando un valore del filtro con lo slider, l'editor automaticamente aggiungerà un keyframe sul fotogramma corrente.
L'editor e ogni filtro aggiunto ha il proprio Hamburger Menu. Dall'Hamburger Menu del filtro ⇒ Open in Keyframe Tool è possibile attivare la visualizzazione del Keyframe Tool sopra la clip nella timeline:

Il tool visualizza il valore assunto dal filtro come un grafico sulla scala del tempo; i keyframe sono punti che possono essere spostati sugli assi X e Y per modificare la posizione temporale e il valore assunto.
Il Keyframe Tool viene attivato anche con un singolo click sulla clip quando si usa l'edit tool Keyframe invece del predefinito Move. In tal caso, se la clip non ha alcun effetto attivo, viene aggiunto automaticamente e visualizzato il filtro audio Volume. Dall'Hamburger Menu del tool è possibile selezionare quale filtro viene visualizzato nel tool stesso (ogni clip può avere uno o più filtri attivi) ed eventualmente passare alla visualizzazione nel Keyframe Editor nel pannello.
How to add fade-in/fade-out effects on both video and audio
- Click the Media panel in the top-center section of the window, right-click to load the raw videos into the panel.
- Double click the original video: it will be loaded into the Monitor (top-right section of the window).
- Play the video in the monitor and select the IN and OUT cut points using key I and O.
- Click the Append Clip button (or press the U key) to insert the selected clip into the timeline (the bottom-center part of the window).
- Repeat the above two steps to add all the required clips into the timeline.
- Add the fade-in/fade-out effect for both video and audio on each clip:
- Double-click the clip into the timeline: the Edit panel will be displayed in the top-center section.
- Using the + button at the bottom of the Edit panel add two effects:
- Fade ⇒ Fade to Black In/Out
- Audio ⇒ Volume
- The two effects will be listed into the Edit panel.
- Click the Hamburger menu button next to the Fade to Black In/Out filter and choose Open in Keyframe Tool.
- A graph of the filter will be displayed over the clip into the timeline. Here you can add handle points (Flowblade calls them keyframes) and move them to change the shape of the line. The fade-in effect is obtained with a line starting from zero and rising to 100 e.g. in 2 seconds. A fade-out is obtained with the line starting from 100 and going down to zero.
- Click anywhere on the timeline to close the Keyframe Tool.
- Similarly click the Hamburger button next the Volume and Open in Keyframe Tool to set the fade-in fade-out for the audio. Notice that normal volume is 0 dB and silence is -70 dB on the scale.
- Clone the filters settings to other clips:
Removing unwanterd keyframes (handle points)
In the Keyframe Tool you may accidentally add a keyframe (handle point) that you want to remove. Close the Keyframe Tool clicking anywhere on the timeline and double click the clip so the Edit panel is shown. Here you can jump over each keyframe added to the filter using the buttons Previous keyframe and Next Keyframe. When you are over the unwanted one, click Delete Keyframe button (the minus).
Picuters
The Edit Panel Keyframe Editor with two filters added: the video Fade to Black In/Out and the audio Volume:
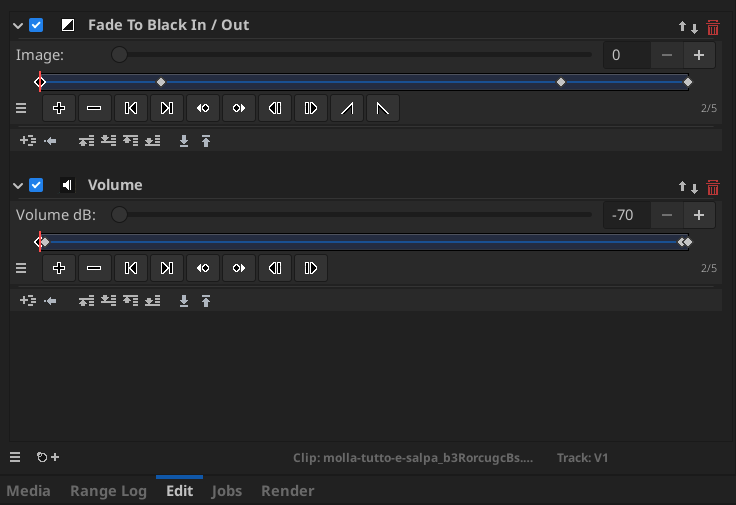
The Keyframe Tool used on the Fade to Black In/Out filter and the audio Volume filter respectively:


How to re-frame a clip (position and scale)
Con un doppio click su una clip nella timeline si apre l'Edit Panel che mostra inizialmente l'assenza di filtri:

Con un click sull'icona + nell'angolo in basso a sinistra dell'Edit Panel si aggiunge un filtro di tipo Transform ⇒ Position Scale.

L'opzione più semplice è quella di non aggiungere keyframe, cioè le impostazioni del filtro saranno uguali per tutta la durata della clip.
Conviene disabilitare il Distort in modo che l'immagine mantenga il corretto rapporto larghezza altezza. L'area grigia rappresenta la zona che sarà visibile nel rendering finale, il rettangolo con il bordo nero e i punti di controllo rappresenta la posizione e la dimesione dell'immagine originale. Il risultato del filtro viene mostrato nel Monitor Panel.
Per modificare il frame si può usare il mouse sull'anteprima del filtro oppure - per un posizionamento più preciso - si possono usare i tasti freccia:
- Tasti freccia: sposta l'origine di 8 pixel nelle quattro direzioni.
- Shift + tasti freccia: modifica la dimensione dell'immagine originale di 8 pixel per volta.
È possible anche immettere da tastiera i valori numerici di posizione e dimensione, basta avere l'accortezza di premere invio dopo aver digitato i numero nella casella. I parametri del filtro sono l'offset a cui spostare l'angolo in alto a sinistra della clip e la nuova dimensione. Solitamente l'offset è negativo in quanto la clip viene ingrandita e spostata verso l'alto a sinistra (X e Y negativi).
Il play di una clip su cui siano stati applicati uno o più filtri è molto oneroso e potrebbe non avvenire in tempo reale su una CPU non abbastanza performante.
Rendering memory leak
Abbiamo sperimentato un memory leak durante il rendering finale di un video. Queste le condizioni in cui si è verificato:
- flowblade 1:2.22.1.1-dmo0+deb13u1 da https://www.deb-multimedia.org trixie/main
- python3-mlt7 1:7.32.0-dmo1 da https://www.deb-multimedia.org trixie/main
- ffmpeg 10:7.1.3-dmo1+deb13u1 da https://www.deb-multimedia.org trixie/main
- Profilo output 2.5K QHD 1440p 59.94 fps (2560×1440).
- Durata del video 37 minuti.
- CPU Intel Core i5-7200U, 16 Gb RAM.
Il processo di rendering terminava intorno al 10%, con il seguente errore in dmesg:
[82395.529730] oom-kill:constraint=CONSTRAINT_NONE,nodemask=(null),cpuset=/,
    mems_allowed=0,global_oom,
    task_memcg=/user.slice/user-1000.slice/user@1000.service/
    app.slice/app-org.kde.konsole-2921.scope,
    task=python3,pid=1937318,uid=1000
[82395.530097] Out of memory: Killed process 1937318 (python3)
    total-vm:25535832kB, anon-rss:14339756kB, file-rss:7212kB, shmem-rss:0kB,
    UID:1000 pgtables:46500kB oom_score_adj:0
Durante il rendering si è monitorato l'andamento della memoria libera (comando free -h) e si è generato un grafico. Si vede che appena viene esaurita la RAM inizia ad esaurirsi anche lo swap, fino a che il kernel effettua il kill del processo:

Durante il rendering si hanno due processi in esecuzuione: flowblade e flowbladesinglerender. È il secondo che esaurisce la memoria. Si tratta del processo che esegue il motore di rendering MLT seguendo il binding python ⇒ python3-mlt7 ⇒ libmlt-7-7:

Come workaround del problema è stato possibile esportare il progetto in formato MLT XLS (File ⇒ Export ⇒ MLT XML) e quindi eseguire il rendering da riga di comando con melt (installato dal pacchetto melt7):
melt '2026-05_spagna.xml' -consumer 'avformat:2026-05_spagna.mkv' \
    f=matroska \
    acodec=aac \
    ab=256k \
    preset=slow \
    vcodec=libx264 \
    threads=0 \
    vprofile=high \
    crf=18
Il parametro principale per controllare la qualità del video è crf; a valori inferiori corrisponde una migliore qualità e un bitrare maggiore. Il valore predefinito per il codec x264 è 23, un valore di 18 dovrebbe corrispondere ad una compressione con perdita di qualità visivamente non percettibile. Nel nostro caso (video 2.7K@60) si è ottenuto un bitrate variabile fra i 43 e i 60 Mb/s.
È possibile effettuare il rendering della sola traccia audio, evitando la codifica del video che è estremamente onerosa per la CPU:
melt '2026-05_spagna.xml' \
    -consumer 'avformat:2026-05_spagna.wav' \
    video_off=1 \
    acodec=pcm_s16le
Questi alcuni parametri utili per melt quando si utilizza il consumer avformat (codifica tramite la libreria ffmpeg). La documentazione completa è su www.mltframework.org, i paraemtri per il codec H.264 di ffmpeg sono documentati su trac.ffmpeg.org.
| f=matroska | Formato del container prodotto: mp4, matroska, ipod, … |
|---|---|
| vcodec=libx264 | Seleziona il codec video H.264. |
| vprofile=high | Il profilo definisce il set di funzionalità, algoritmi e strumenti di compressione che l'encoder H.264 può utilizzare. Serve a garantire la compatibilità del video con i dispositivi di riproduzione. Valori possibili: baseline, main, high, high10, … Alcuni bitrate più elevati richiedono profili più elevati. |
| preset=slow | Determina la velocità di codifica e l'efficienza della compressione del codec H.264: ultrafast, superfast, veryfast, faster, fast, medium, slow, slower, veryslow. |
| crf=18 | Constant Rate Factor, definisce la qualità visiva percepita che si desidera ottenere nel video. Valori più bassi determinano una migliore qualità. 18 visivamente senza perdita (adatto all'archiviazione); 23 valore predefinito per x264; 28 buono per lo streaming. |
| video_off=1 | Non processa il flusso video, utile ad esempio per effettuare la codifica del solo audio. |
| vn=1 | Esclude il flusso video nell'output, ma il video viene comunque elaborato. |
| acodec=aac | Codec audio per l'output aac, pcm_s16le, … |
| ab=256k | Bitrate per il flusso audio. |
Impostazioni
- View ⇒ Monitor Playback Interpolation ⇒ Nearest Neighbour (fast)
- Edit ⇒ Preferences ⇒ Warning on Disk Cache Size