Table of Contents
Internet of Things: Sonoff Basic R2
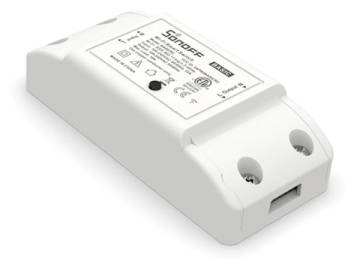
![]() Il vantaggio di quesi power switch intelligenti marchiati Sonoff, è che sono facilmente programmabili con il firmware Tasmota. Tasmota è un progetto free ed open source che consente di realizzare la propria infrastruttura IoT totalmente indipendente da qualunque architettura cloud di terze parti. In pratica è possibile gestire i dispositivi basati sul chip ESP8266 utilizzando protocolli aperti (MQTT) e creando il proprio server cloud, ad esempio con il broker MQTT mosquitto, ed utilizzando i più vari MQTT client, come ad esempio Home Assistant.
Il vantaggio di quesi power switch intelligenti marchiati Sonoff, è che sono facilmente programmabili con il firmware Tasmota. Tasmota è un progetto free ed open source che consente di realizzare la propria infrastruttura IoT totalmente indipendente da qualunque architettura cloud di terze parti. In pratica è possibile gestire i dispositivi basati sul chip ESP8266 utilizzando protocolli aperti (MQTT) e creando il proprio server cloud, ad esempio con il broker MQTT mosquitto, ed utilizzando i più vari MQTT client, come ad esempio Home Assistant.
![]() The main advantage of Sonoff branded smart power switches is that they are easily programmable with the Tasmota firmware. Tasmota is a free and open source software that allows you to create your own IoT infrastructure totally independent from any third-party cloud architecture. In practice, it is possible to manage devices based on the ESP8266 chip using open protocols (MQTT) and creating your own cloud server, for example with the MQTT mosquitto broker, and using the most various MQTT clients, such as Home Assistant.
The main advantage of Sonoff branded smart power switches is that they are easily programmable with the Tasmota firmware. Tasmota is a free and open source software that allows you to create your own IoT infrastructure totally independent from any third-party cloud architecture. In practice, it is possible to manage devices based on the ESP8266 chip using open protocols (MQTT) and creating your own cloud server, for example with the MQTT mosquitto broker, and using the most various MQTT clients, such as Home Assistant.
To open the plastic case of the Sonoff Basic R2 you have to unlock the four snap fit joints: there are two on each of the long edges.
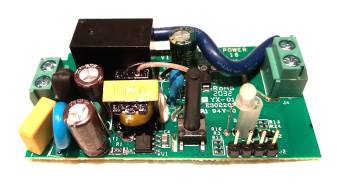
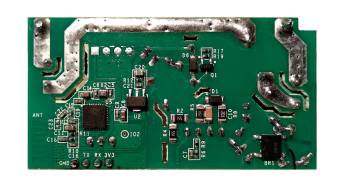
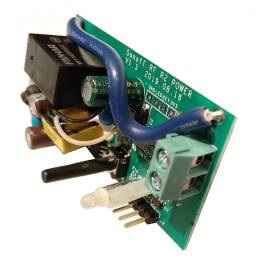
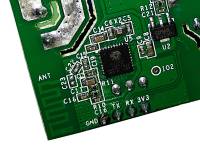
In the following pictures you can see the pin headers that I soldered on the PCB, that pin will be used to connect the USB to serial adapter used to flash the Tasmota firmware.
Tools required to flash the Tasmota firmware
- Pin headers to be soldered on the Sonoff Basic PCB.
- An USB to serial adapter.
- The esptool.py flashing tool (Python program).
- The tasmota.bin firmware to be uploaded (flashed) into the Sonoff Basic.
You can download the esptool.py form the esptool GitHub repository, I used version 3.0. You can install it or just extract the archive and run it from the extract directory.
The Tasmota firmware can be downloaded from the Tasmota GitHub repository, I used the tasmota.bin version 9.2.0 found into the download page.
Flashing the Tasmota firmware
To flash the Tasmota firmware I used a GNU/Linux computer and an USB to serial adapter based on the CP210x chip. With the help of a multimeter I verified that the adapter provides the 3.3 Volt power on the proper pin: this current is used to power the Sonoff device during the flash.
- Disconnect the Sonoff Basic from AC power.
- Connect the USB to serial adapter to the Sonoff serial, all the 4 wires are required: 3.3 Volt, TX, RX and GND. The TX line of the adapter is connected to the RX line of Sonoff, and vice-versa.
- Execute each step of the flashing procedure in this manner:
- Connect the USB adapter to the computer while holding down the push button of the Sonoff device. Keeping the button pressed for 7 seconds is sufficient. Keeping the button pressed while power-on is required to put the device into a special programming mode.
- Execute the required esptool.py command on the PC.
- Disconnect the USB adapter from the PC.
This is the concise list of commands I used (remember: all the commands are executed after the Sonoff device is booted in programming mode as explained above!):
./esptool.py --port /dev/ttyUSB0 flash_id
./esptool.py --port /dev/ttyUSB0 read_flash 0x00000 0x100000 sonoff-r2-1mb.orig.bin
./esptool.py --port /dev/ttyUSB0 erase_flash
./esptool.py --port /dev/ttyUSB0 write_flash -fs 1MB -fm dout 0x0 tasmota.bin
Running the command ./esptool.py -h you get the explanation of each command, this is a summary of what I used:
| flash_id | Read SPI flash manufacturer and device ID |
|---|---|
| read_flash | Read SPI flash content |
| erase_flash | Perform Chip Erase on SPI flash |
| write_flash | Write a binary blob to flash |
Here it is the output generated by the write_flash command:
./esptool.py --port /dev/ttyUSB0 write_flash -fs 1MB -fm dout 0x0 tasmota.bin
esptool.py v3.0
Serial port /dev/ttyUSB0
Connecting....
Detecting chip type... ESP8266
Chip is ESP8285
Features: WiFi, Embedded Flash
Crystal is 26MHz
MAC: c8:2b:96:ee:b8:3c
Uploading stub...
Running stub...
Stub running...
Configuring flash size...
Compressed 600960 bytes to 428969...
Wrote 600960 bytes (428969 compressed) at 0x00000000 in 37.9 seconds (effective 127.0 kbit/s)...
Hash of data verified.
Leaving...
Hard resetting via RTS pin...
After the write_flash command you can power-cycle the Sonoff device by unplugging and plugging the USB adapter again, this time without holding the Sonoff button. The LED on the Sonoff flashes in blue, the device starts into Access Point mode and stays this way for about three minutes, connect a smartphone or the notebook to it (search for an ESSID like tasmota-xxxx) and browse the address http://192.168.1.4/. Here you have to configure the WiFi parameters to let the Sonoff Basic connect to your WiFi network; you can specify two different ESSID, that the Tasmota firmware will search to connect to.
NOTICE 
| AP1 SSId/Password | ESSID and password of the first Access Point |
|---|---|
| AP2 SSId/Password | ESSID and password of the second Access Point |
| Hostname | The name used when registering to the DHCP server. Defaults to %s-%04d which means the name you will configure into MQTT topic (see below), followed by a four digits decimal number. The number is derived from the 13 least significant bits of the MAC address. |
| CORS Domain | If empty (default) Tasmota allows HTTP requests only from the connecting client. You can specify an asterisk to allow the sharing of resources with any domains, or you can specify just one URL (e.g. http://host.domain.tld) which will be the only one domain allowed to share Tasmota HTTP resources. |
Hardware Module Configuration
After WiFi configuration, you can reboot the Tasmota device, wait unitll it gets an address from your WiFi Access Point and complete the configuration; you have to tell to the Tasmota firmware what hardware it can control.
- Configure the device name and template. Choose a name to identify this device and select the appropriate template. The template tells the firmware how to use the hardware (the relay and the LED): just use the default Sonoff Basic (1).
- Configuration ⇒ Configure Template ⇒ Based on ⇒ Sonoff Basic (1)
- Protect the web access with a password (beware that it uses plain http, so password can be sniffed along the network):
- Configuration ⇒ Configure Other ⇒ Web Admin Password
- Disable the Access Point mode if WiFi AP is missing. If the device is unable to connect to the two configured WiFi networks, it enters automatically into the WifiConfig Access Point mode, allowing a WiFi client to connect and make configuration (this is the WifiConfig mode 2). This is can be a security threat if you have not set the web access password. You can go further in securing the device by changing the WifiConfig mode:
- Connecto to the web interface, Main Menu ⇒ Console and enter the command WifiConfig 5. This means wait until selected AP is available again without rebooting. Beware that the 6 short presses of the button (see below) will revert to WifiConfig 2.
Button Reset
If you have trouble connecting to a Tasmota device and the device have a button, you have at least two methods to try to recover.
| 6 short presses | Press the button six times very quickly (be rapid enough to prevent the relay switch to toggle). Tasmota changes to WifiConfig 2 mode, i.e. it starts the Wi-Fi Manager Access Point (with web server at 192.168.4.1) for 3 minutes, then reboot. This button behaviour can be disabled using SetOption1 1. The WifiConfig mode 2 remains permanent unless you reconfigure it, this means that if the device is unable to find one of the two Access Points it knowns, it switches into the Access Point mode allowing WiFi clients to connect. |
|---|---|
| Long press for 40 seconds | Tasmota will reset to firmware defaults and restart. |
Controlling Tasmota via MQTT
MQTT is a client/server protocol, it allows a client to send messages to other clients which are subscribed to a common topic. The server acts as a broker for this publish/subscribe mechanism.
WARNING: Commands over MQTT are sent in clear-text, including passwords. You must trust your network against traffic sniffing! Using TLS in Tasmota is disabled by default, because it requires too much memory; see the page TLS Secured MQTT.
Installing a MQTT Broker
On a GNU/Linux Debian host (version 10 Buster) I installed the following packages:
- mosquitto
- mosquitto-clients
The daemon mosquitto is running and listening on port TCP/1883. The traffic on this port is unencrypted so although passwords are usually used, beware when you open the firewall, etc.
With default configuration, the mosquitto broker is open to everyone, just try to subscribe to a topic and - from another terminal - publish something on the same topic:
mosquitto_sub -h mqtt.server.tld -t my_topic
mosquitto_pub -h mqtt.server.tld -t my_topic -m "Hello, world!"
On the first terminal you will get the message Hello, world!.
Configuring MQTT on Tasmota
From the Tasmota Main menu ⇒ Configuration ⇒ Configure MQTT:
| Host | Hostname or IP address of the MQTT server. |
|---|---|
| Port | Default is 1883, which is MQTT TCP unencrypted. |
| Client | Default is DVES_%06X, where %06X means the last 3 bytes of MAC address, in hex. |
| User | Username for authenticating on the MQTT broker, default is DVES_USER. |
| Password | Password for authenticating on the MQTT broker. |
| Topic | Default is tasmota_%06X, where %06X means the last 3 bytes of MAC address, in hex. |
| Full Topic | Default is %prefix%/%topic%/ |
From the Tasmota Main menu ⇒ Configuration ⇒ Configure other:
| MQTT enable | Checkbox to enable the service. |
|---|---|
| Device Name | Default is Tasmota. |
| Friendly Name 1 | Used by the autodiscovery feature, default is Tasmota. |
Here it is an example to publish an MQTT message asking the Sonoff device to toggle the switch:
mosquitto_pub -h mqtt.server.tld -t 'cmnd/tasmota_EEB73A/Power' -m 'TOGGLE'
NOTICE: If you use a non-existent topic (e.g. a wrong device name), no error is reported.
Obviously the device understands the TOGGLE, ON and OFF messages. If you are subscribed to the proper MQTT topic, you will receive a message for each toggle:
mosquitto_sub -h mqtt.server.tld -t "stat/tasmota_EEB73A/RESULT"
{"POWER":"OFF"}
{"POWER":"ON"}
Password protect the Mosquitto broker
A default Debian installation of the mosquitto server does not require a password from the connecting client.
To manage a password file you can use the mosquitto_passwd tool. The following example will add two users to the file: for each username, a passowrd is asked interactively. The -c option is used to create first the password file:
mosquitto_passwd -c /etc/mosquitto/passwd DVES_USER
mosquitto_passwd /etc/mosquitto/passwd mqtt-client
The file contains sha512 hashes; to avoid world-readability you can change the file mode to 0640. The file is read at program start using root privileges; if the file is changed the mosquitto server must be restarted.
Then we define an Access Control List creating a /etc/mosquitto/acls file:
user DVES_USER
topic readwrite +/tasmota_EEB73A/#

user mqtt-client
topic write cmnd/tasmota_EEB73A/Power
topic read stat/tasmota_EEB73A/RESULT
In the above example we granted the DVES_USER (the default username used by the Tasmota firmware) the read and write rights over a topic composed by the + wildcard (single level wildcard), the device name tasmota_EEB73A, followed by the # (multi level wildcard). The topic will match e.g. tele/smart-cable/INFO1. Then we granted to the user mqtt-client the write rights to change the relay status and the read rights to read the RESULT of a change.
This may be an over-complicated setting, in a basic scenario using a line topic readwrite # will grant full read/write rights on every topic.
Finally we tell mosquitto to use the above two files by adding a file /etc/mosquitto/conf.d/auth.conf:
allow_anonymous false
password_file /etc/mosquitto/passwd
acl_file /etc/mosquitto/acls
After restarting the server, you have to specify the correct username and password when you execute mosquitto_pub, otherwise the command will fail:
mosquitto_pub -h mqtt.server.tld -u 'mqtt-client' -P 'BadPasswd' -t 'cmnd/tasmota_EEB73A/Power' -m 'ON'
Connection Refused: not authorised.
Error: The connection was refused.
WARNING: The mosquitto_pub command will fail with an error exit code if you fail the authentication, but if you try to access a non-existent topic or if you don't have the rights, you will get no errors.
Controlling Tasmota via HTTP GET
The Tasmota firmware exposes an open, admin mode, web interface to configure and control the device status (this default can be changed). It is advisable to set a password from Main menu ⇒ Configuration ⇒ Configure Other ⇒ Web Admin Password. The default username is admin.
WARNING: Commands over HTTP are sent in clear-text, including passwords. You must trust your network against traffic sniffing!
Suppose that your Tasmota device has IP address 10.0.0.114, username admin and password MySecret, you can remotely control it on the command line using GET commands, e.g. using wget:
# Control the relay status: Toggle, switch it On, switch it Off.
wget -q -O /dev/null 'http://10.0.0.114/cm?user=admin&password=MySecret&cmnd=Power%20Toggle'
wget -q -O /dev/null 'http://10.0.0.114/cm?user=admin&password=MySecret&cmnd=Power%20On'
wget -q -O /dev/null 'http://10.0.0.114/cm?user=admin&password=MySecret&cmnd=Power%20Off'
If you want to read the relay status after the command, read the output of the GET request (a JSON string):
wget -q -O - 'http://10.0.0.114/cm?user=admin&password=MySecret&cmnd=Power'
{"POWER":"ON"}
Timezone
To set the correct timezone for Italy, with the correct beginning of daylight saving time (DST) and return back to standard time (STD), you can use the following commands into the console (accessible from the main menu of the web interface):
TimeZone 99
TimeDST 0,0,3,1,2,120
TimeSTD 0,0,10,1,3,60
You may also want to set the proper geographic location, so that sunrise and sunset times can be correctly guessed:
Latitude 43.2793
Longitude 11.1182
For a full explanation of the commands, see the page Tasmota Commands.

