Table of Contents
A manual lens on a mirrorless camera
The Meike 25mm f1.8 on the Olympus E-M10 Mark II
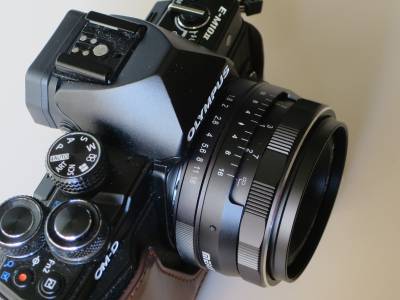
On this page we will explain what it means to use a manual lens on a mirrorless camera. In particular we will use the Meike 25 mm f/1.8 lens on an Olympus E-M10 Mark II mirrorless camera. The Olympus is a Micro Four Thirds system camera, accepting lenses with auto focus, zoom and aperture controlled by wire. This means that normally the camera body controls via electrical signals all the settings of the lens, getting back lens information that will be embedded into the EXIF metadata.
On the other side, this Meike is a manual lens. It does not have any electronic component inside: there are no electrical contacts between the lens and the camera body. This means that focus and aperture are controlled by the mechanical rings on the lens itself and the camera does not have any idea about that settings, nor about what lens is actually mounted. The aperture ring works directly on the diaphragm blades: if you close the aperture, less light will hit the sensor and the camera will be able to evaluate the exposure.
I bought this lens for about 79.00 € in October 2022, on the Amazon marketplace.
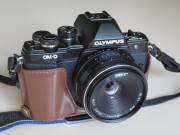
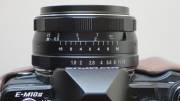 The body of the lens is build from metal, so it feels sturdy and solid. The aperture ring does not have mechanical feedback over the stops: it turns smoothly from f/1.8 to f/16 with a little friction, so it should not move inadvertently.
The focus ring also has a little friction that should prevent unwanted moves, the external element does not rotate on focusing, so you can mount e.g. a 49 mm polarizer filter and it will not rotate on focusing. A depth of field scale is printed on the lens body (but it is totally wrong, see below).
Meike 25mm f1.8 Specs
Lens specification as reported on the vendor page:
| Focal Length | 25 mm |
|---|---|
| Maximum Aperture | f/1.8 |
| Minimun Aperture | f/16 |
| Diaphragm Blades | 9 |
| Filter Size | 49 mm |
| APS-C Visual angle | diagonal 61° horizontal 50° vertical 35° |
| Lens construction | 7 elements in 5 groups, multi-layer coatings |
| Minimun Focus Distance | 0.25 m |
| Diameter | 60.5 mm |
| Length | 40.9 mm |
| Product Weight | 190 g |
Modes M, S, A and P
This manual lens does not communicate the aperture value to the camera body, so the aperture value reading on the LCD display is always represented as the _._ string. However that indicator is used in S Mode to signify a correct exposure when it stops blinking.
Here it is an overview of some possible operation modes and how controls works in that modes.
| Manual adjust to get the desired Exposure Value | |
|---|---|
| Mode | M (manual) |
| ISO | Choose the desired ISO sensitivity |
| Front dial | No Operation |
| Rear dial | Choose the shutter speed |
| Aperture ring | Choose the aperture |
| LCD Feedback | The Exposure compensation indicator shows when exposition is correct. |
| Automatically set the ISO sensitivity | |
| Mode | S (shutter-priority) |
| ISO | AUTO |
| Front dial | Choose the exposure compensation |
| Rear dial | Choose the shutter speed |
| Aperture ring | Choose the aperture |
| LCD Feedback | The aperture value (_._) blinks if exposition is wrong. |
| Automatically set the shutter speed | |
| Mode | A (aperture-priority) |
| ISO | Choose the desired ISO sensitivity |
| Front dial | Choose the exposure compensation |
| Rear dial | No Operation |
| Aperture ring | Choose the aperture |
| LCD Feedback | Shutter speed blinks if expositionis wrong. |
| Automatically set shutter speed and ISO sensitivity | |
| Mode | A (aperture-priority) |
| ISO | AUTO |
| Front dial | Choose the exposure compensation |
| Rear dial | No Operation |
| Aperture ring | Choose the aperture |
| LCD Feedback | Shutter speed blinks if exposition is wrong. |
Two suggested modes
When using a manual lens the obvious mode to choose is Mode M, but in my opinion it is possible to use Mode S and Mode A at some degree, to have some parameters automatically set by the camera. I suggest two modes in the following paragraphs.
Mode S with auto ISO
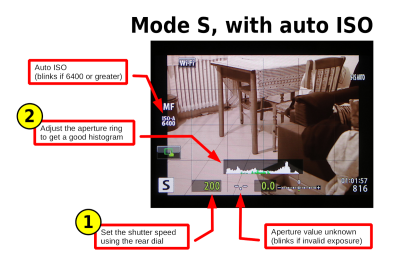 I consider this an almost manual mode: you set the shutter speed and the aperture and the camera automatically sets the ISO sensitivity.
- Choose the shutter speed with the rear dial.
- Choose the aperture with the ring.
- Check if the automatically choosen ISO sensitivity is acceptable (aperture value blinks if a correct exposure cannot be obtained).


Mode A with manual ISO
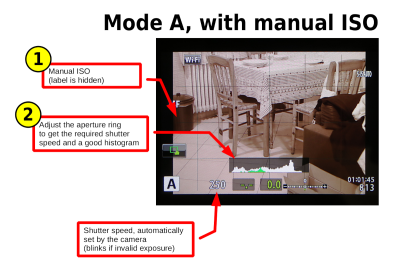 I consider this an almost automatic mode: once you fixed the ISO sensitivity, you choose the aperture and camera automatically sets the shutter speed.
- Set the desired ISO sensitivity.
- Choose the aperture with the ring.
- Check if automatically choosen shutter speed is acceptable (shutter speed blinks if a correct exposure cannot be obtained).


Consideration on modes
Mode P
Mode P operates identically to mode A.
Exposure feedbak in Mode M
In M mode the camera does not automatically adjust any parameter: you can manually adjust the settings untill you read 0.0 into the exposure compensation indicator.
Long exposure times
When using A and P modes, the longest exposure time is self-limited by the camera upon the ISO sensitivity: e.g. at 200 ISO the longer shutter speed available is 15", at 400 ISO it is 8", etc. (the higher the ISO number, the shorter max exposure time). Longer exposure times, up to the maximum of 60", can be selected in M and S modes only.
Mode A: automatic shutter speed target is 1/100s
Using Mode A with auto ISO the camera will try to keep the shutter speed above 1/100 by increasing the ISO sensitivity.
ISO sensitivity blinks
In auto ISO mode the ISO sensitivity blinks if it is 6400 or greater, even if the exposure is correct. This is probably to means a warning about eventual too much noise into the resulting photo.
Don't use Mode S and fixed ISO
It is rather pointless to use Mode S with fixed ISO because there is no feedback on the LCD display about getting a correct exposure; the aperture value indicator is always blinking on the LCD.
Suggested settings
- Image Stabilization - It is possibile to use the S-IS (Still Image Stabilization) with a manual lens, but you have to inform the camera about the focal length of the lens. From the Super Control Panel choose Image Stabilization and then press INFO.
- Live View Boost - Disable Live View Boost for the mode you will use (see p.101 of the manual). If Live View Boost is enabled, exposure compensation is not visible in the monitor and also the histogram does not reflect what will be the actual exposure.
- Brightness histogram - Configure the LV-info (live view information display) to include the brightness histogram (see p.21 and p.101 of the manual). You can configure Custom display 1 or Custom display 2).
- Focus Peaking - Normally I use the Fn3 button to enter the manual focus mode. When using a manual lens instead I configure it to activate the focus peaking feature. Having a very shallow depth of field, it is very useful to view the bright peaking pixels moving from the near objects to the far ones when adjusting the focus ring. Button progrmming can be done from the Super Control Panel.
- ISO sensitivity range - Use the full range from 200 to 25600 ISO, changing the default for High Limit (see p.53 and p.103 of the manual).
Focusing
The focus ring on the lens is graduated both in feets and meters. Meter marks are at 0.25, 0.30, 0.40, 0.60, 1, 2 meters and infinite; they correspond quite precisely to the actual focus. Notice that the rotation stops beyond the infinite position: so beware to limit the rotation at the infinite mark or you will get out-of-focus shots.
Sharpness
The photos below were taken in manual mode, the focus point is the center of the tiled roof, a little above the center of the picture. The roof is at a distance of about 100 m from the camera.
Theoretically with a subject distance of 100 m, a lens with focal length of 25mm and an aperture of f/1.8, the depth of field should range from 18.96 m to infinity. With an aperture of f/16 the depth of field starts even more near: at 2.54 m.
Manual focusing was repeated before each shot. Actually it turned out that even a micrometric adjustment of the focus ring produces visible effects into the photo. Take a look at the balcony railing in the upper-left corner of the first f/1.8 photo: by chance it is more sharp than into the f/4.0 photo! By contrast the chimneys at the center of the photo are certainly sharper in the f/4.0 shot than in the f/16.0 one. In my opinion this means that even a small focus adjustment, negligible where you are concentrating your attention, can produce some blur at the edges of the frame.
My conclusion is that, if you want very sharp photos, you have to focus very carefully looking through the electronic viewfinder. Setting the lens to the hyperfocal distance and hoping that all things will be into an acceptable focus (from the hyperfocal near limit to the infinite) will produce by far sub-optimal results.
You can compare the sharpness obtained with the M.ZUIKO 14-42 mm f/3.5-5.6 pancake lens. The following shots where taken using manual focus and using a focal length of 25 mm:
In my opinion the camera exposure metering produces darker images with the manual lens than with the M.Zuiko lens by about 1/4 stop. Neverthless, the manual lens is faster at least by 1/2 stop for the same aperture. Undoubtedly the M.Zuiko lens have a more uniform sharpness from center to edges (despite being a variable focal length) and it is most forgiving if you miss the exact focus point, but the Meike lens give you 2 full stop of more aperture for about one quarter of the price! Furthermore, if you use the extra aperture to get a shallow depth of field (the famous bokeh effect, which is very limited with the M.Zuiko at f/4.7), then you obviusly need to pay great attention to a precise focusing of your subject while sharpness center-to-edges is not your main goal.
Probably, if you want to play extensively with large apertures for a very shallow depth of field, you have to use a neutral density filter to reduce the light, otherwise very easly you will find that the camera sets 1/4000s and ISO 200 and the frame is still overexposed.
Vignetting
I photographed a blue sky at different apertures to check for the vignetting effect. The camera body may know the characteristics of some Olympus original lenses and apply a vignette correction directly to the JPEG of the photos (verify that option Custom Menu ⇒ G. ImageQuality/Color/WB ⇒ Shading Comp. is On). Obviously the camera does not know this Meike lens and therefore it will not apply any corrections. However, the vignette effect seems to me quite negligible. Check yourself the following examples:
Compare them with those taken with the original lens M.Zuiko Digital 14-42mm f/3.5-5.6 pankake, set at the same focal length of 25 mm:
Wrong depth-of-field scale
The depth-of-field scale printed on the body of the lens is totally fake!
Using one of the many online DoF calculator (e.g. this one at photopills.com), set the aperture to f/16 and the subject distance to 2.62 m: you will get a depth-of-field from 1.31 m to infinite. If you read the DoF scale on the lens, it seems instead that at f/16 you can obtain a DoF from 0.6 m to infinite, placing the subject at about 1.3 m. Unfortunately this is TOTALLY WRONG!
What is the explanation for this embarrassing situation? The scale would simply work if the lens were mounted on a Full-frame DSLR camera, not on a Micro Four Thirds!
As a rule of thumb, you can mentally convert your f/stop to the DoF marks printed on the lens body using the following table (a correction of two stops):
| Depth-of-field equivalence | |
|---|---|
| MFT f/stop | Full-frame f/stop |
| f/8 | f/4 |
| f/11 | f/5.6 |
| f/16 | f/8 |
Depth of field
The hyperfocal distance is the distance to focus to have the max depth of field at the given aperture and focal length. All objects in the DoF range are into an “acceptable” focus. The DoF near limit is half the hyperfocal distance, the far limit is inifinity.
| Using a 25 mm lens on a Micro Four Thirds sensor | |
|---|---|
| f/value | Hyperfocal Distance |
| f/1.8 | 23.41 m |
| f/2 | 20.86 m |
| f/2.8 | 14.76 m |
| f/4 | 10.44 m |
| f/5.6 | 7.39 m |
| f/8 | 5.23 m |
| f/11 | 3.71 m |
| f/16 | 2.63 m |
Depth of field in portraits
Here is an handy table to know the depth of field when shoting portraits. I think that the wider apertures of the Meike (f/numbers below 4.7) are extremely effective starting from medium or more distant shots. With close-ups, care must be taken that not all parts of the head may be in focus.
| Framing with a 25 mm lens, MFT sensor (50 mm eq.) | Depth of field | ||||
|---|---|---|---|---|---|
| Shot type | Height dim. | Focal length | f/1.8 | f/5.6 | f/16 |
| Choker (from eyebrows to mouth) | 20 cm | 42 cm | 1 cm | 5 cm | 13 cm |
| Close-up (shoulder and head) | 40 cm | 84 cm | 6 cm | 19 cm | 58 cm |
| Medium shot (from the waist up) | 70 cm | 146 cm | 18 cm | 59 cm | 231 cm |
| American shot (mid thigh) | 120 cm | 250 cm | 54 cm | 189 cm | 49 m |
| Full shot (head to toes) | 200 cm | 417 cm | 153 cm | 687 cm | ∞ |
EXIF data
As you can imagine, the Olympus camera cannot add any information about the lens into the Exif metadata of the image. If you want you can add some of the missing data using a PC and the exiv2 command line tool. Here it is an example of adding the model of the lens and the focal length:
exiv2 -M "set Exif.Photo.LensModel MEIKE MK 25mm F1.8" IMAGE.JPG
exiv2 -M "set Exif.Photo.FocalLength 250/10" IMAGE.JPG
If you ever made a note of the aperture value, you can add using a decimal fraction, like this e.g. for an f/1.8:
exiv2 -M "set Exif.Photo.FNumber 18/10" IMAGE.JPG
Third party lens manufacturer
There are several vendors of manual lenses that can be mounted on cameras of well known manufacturers, such as Olympus, Canon, Nikon, etc. They offer good quality for a fraction of the cost of the original lenses. Almost all are Chinese manufacturer, which have reached very high standards of quality. Here a partial list of some of them, please follow the link to sponsor my affiliate programs.

