Table of Contents
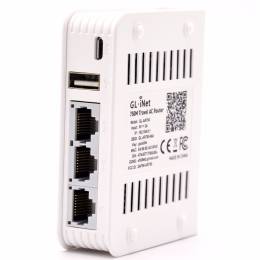
GL-iNet GL-AR750 Travel AC Router
Default IP address and password
| IP Address | 192.168.8.1 (on LAN ports) |
|---|---|
| Password | No default password, a new password is asked at first access |
Factory Reset
The 3-seconds repair does not work
GL-iNet, in their documentation, talk about a Repair procedure: keep the reset button pressed for 3 seconds (the power LED starts flashing slowly). This should repair the network config, but in our case it did not work.
The 10-seconds reset
Press and hold for 10 seconds the reset button (the power LED starts flashing quickly) then release to reset the router to factory settings. All user data will be cleared.
Configuring the switch from the command line
The GL-AR750 contains a switch with 5 ports (numbered from #0 to #4) capable of VLANs: two ports are exposed to the to the outside as the LAN 1 and LAN 2 ports, the same switch has the port #0 internally connected with the CPU eth1.
| Port | Connection |
|---|---|
| 0 | Connected to CPU eth0 at 1Gbit full-duplex. |
| 1 | Connected to LAN 1 external port (toward the power socket). |
| 2 | Connected to LAN 2 external port. |
| 3 | Not connected. |
| 4 | Not connected. |
The switch can be configured through the LuCI interface Network ⇒ Switch or using the swconfig tool from the command line. See the OpenWRT documentation about swconfig.
View the existing switches:
swconfig list
Found: switch0 - eth1
To view the full configuration use the command:
swconfig dev switch0 show
To view only PORT #1 settings:
swconfig dev switch0 port 1 show
Port 1:
        enable_mirror_rx: 0
        enable_mirror_tx: 0
        pvid: 1
        link: port:1 link:up speed:100baseT full-duplex auto
Notice the pvid parameter: when an untagged packet arrives to that port, it gets the VLAN #1 tag attacched.
To view only VLAN #1 settings:
swconfig dev switch0 vlan 1 show
VLAN 1:
        vid: 1
        ports: 0t 1 2
In the example above, you can see that VLAN #1 is connected to port #0 tagged, to port #1 untagged and port #2 untagged.
To change the port tagged/untagged/off state for VLAN #1:
swconfig dev switch0 vlan 1 set ports "0t 1"
swconfig dev switch0 set apply
VLAN limitations
There is a limit to 16 VLANs, numbered from #0 to #15. Default configuration uses VLAN #1 for eth1.1 which is connected to bridge br-lan. This limitation is not visible from the LuCI web interface: any number greater than 15 will be silently accepted, but it will be not functional.
You can view the actual switch configuration using:
swconfig dev switch0 show
You can check the limit issuing the following command (notice the error message):
swconfig dev switch0 vlan 16 set vid 16
Failed to set attribute: Invalid input data or parameter
You cannot mix tagged and untagged VLAN on the same switch port.
- Only one port is allowed to carry untagged traffic for a specific VLAN.
- You cannot mix tagged and untagged VLAN on the same port. E.g. if a port carries untagged VLAN#10, the same port cannot carries tagged VLAN#11 (depending upon the order of the commands, the settings will be changed to carry buth as tagged).
Limitation example #1: the untagged VLAN#10 is removed from port #1 and #2:
swconfig dev switch0 vlan 10 set ports "0t 1 2"
swconfig dev switch0 vlan 11 set ports "0t 1 2"
swconfig dev switch0 show
...
VLAN 10:
        vid: 10
        ports: 0t
VLAN 11:
        vid: 11
        ports: 0t 1 2
Limitation example #2: the untagged VLAN#10 is changed to tagged on port #1 and it is removed from port #2:
swconfig dev switch0 vlan 10 set ports "0t 1 2"
swconfig dev switch0 vlan 11 set ports "0t 1t 2"
VLAN 10:
        vid: 10
        ports: 0t 1t
VLAN 11:
        vid: 11
        ports: 0t 1t 2
Configuring a DMZ
We used VLAN to configure a DMZ … 
Configuration
Change SSH Port
From the LuCI interface:
- System ⇒ Administration ⇒ SSH Access
- Port:
Install the tcpdump package
From the command line:
opkg update
# tcpdump-mini requires ??? kb:
opkg install tcpdump-mini
# coreutils-base64 requires 28 kb:
opkg install coreutils-base64
Crontabs
crontab -e
/etc/init.d/cron enable
/etc/init.d/cron start
ps | grep crond

